Hi Everyone!! Have you ever seen a beautiful jacket and just had to have it?? Well, I do all the time, but with a $700.00 price tag, that’s just not in my reality. BUT it inspired me to make my own version!! I’ve seriously been tripping over this jacket at every turn. I subscribe to the All Saints emails where this jacket is featured repeatedly and then there’s the Facebook advertising I keep seeing over and over. It just seems like it was meant for me to create my own version. It’s the perfect Rocker Chic Leather Jacket. It’s the Marin from All Saints.

I discovered the store “All Saints” back in 2010 while visiting a friend in NYC. It’s an amazing store that displays all kinds of vintage sewing and manufacturing machines in it’s front window and throughout the store. They carry an edgy collection of clothing for both men and women. If you haven’t been to one of their stores, it’s worth it to check it out.

I used Simplicity # 2341 for my basic pattern, but drafted many changes and added details. There were several pieces I need to draft to accommodate lining which this pattern did not provide for. I love lining my jackets. It just makes them feel so good. I used a brightly colored Charmeuse lining that I thought was pretty. It’s fun to have an unexpected burst of color when you take off your jacket especially when your jacket is black. The background of the lining is black, but the coral, kiwi and ultraviolet give it a punch of color!!

I was drawn to the texture of the leather. It reminded me of a fabric I’ve had in my stash for a while and thought it would be great for a lightweight version for my jacket. My fabric is what’s called Matelassé. It has 2 layers woven together to create the special texture.

I loved the quilted leather details in the Marin, but wasn’t sure that adding texture to my already textured fabric would work. But why not?? The “Marin” has a beautiful quilted leather texture to add another layer of interest. So why couldn’t I, right?? I made a couple of samples trying different layers with single and doubled thread for the quilted areas. I fused the fashion fabric with a layer of fusible tricot to give the jacket body but not stiffness. In the quilted sections I added two layers of felt and then stitched the quilting details with a doubled thread. It’s subtle but added meaning and interest. The Jacket pattern I used is a pretty basic princess line. There are other views included in this pattern, but with all the details I added I wanted to keep it simple. I’m referring to all the quilted details to give my jacket a similar look to The Marin. The shoulders, upper sleeve and back of the jacket all received this special treatment.


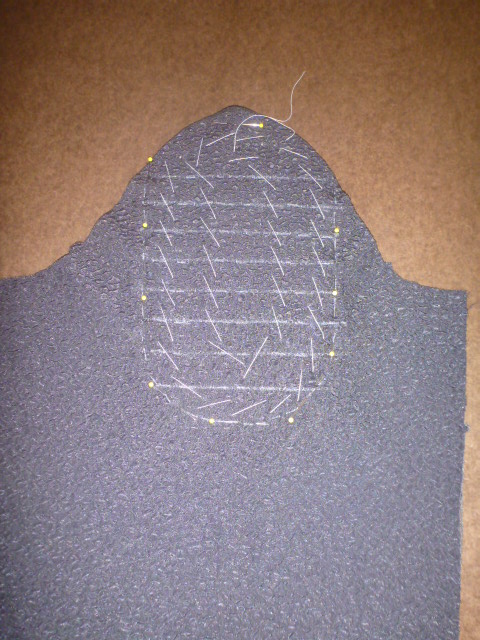
The first 2 pictures above show the detail I added to the center of the sleeve. The second 2 pictures show the detail I add to the center back of the jacket. I forgot to take a picture of the shoulder detail in progress. Adding the quilted detail to that section required me to put the shoulder seam together first. I know I did a lot of basting, but it really holds things in place better than just pins. There were 2 layers of felt to keep in place in addition to the fused fashion fabric so it was pretty thick.


In addition to all the quilted details I added, I also added a standup collar to my version which finished off the neckline nicely.

I also added zippers and lining to my front pockets. The Marin doesn’t have any front closures, but I liked the look of the heavy silver zippers for my version.


The jacket body itself went together quickly after my quilted details were completed. I did quite a bit of hand tailoring to this jacket by adding the lining and inside sewing. My lining is joined inside to the fashion fabric at the front princess seams, shoulder seams and the side seams inside the seam allowances. This is a detail I learned in tailoring class in college. It makes the jacket and lining into one so things don’t shift around. I also added pad stitching by hand for the shoulder roll and sleeve roll within the quilted detail. If I had quilted it flat with no roll, the shoulders would not have the shape I wanted and the sleeves would not have been round at the shoulders. This was a good challenge for me since next month the “Little French Jacket Sew-along” begins!! I’m told that sewing a Chanel inspired jacket should take 70 hours to complete.
Here are the pictures of the finished jacket. I’m very happy with the results. It’s lightweight and comfortable. It really does look like the inspiration jacket from All Saints. I will probably make a pencil skirt to match at some point in the future for a suited look.

Thanks for stopping by and reading my blog. I appreciate all the comments, emails and messages I receive from some of you. I love hearing your suggestions for my continuing video series as well. Stay tuned for a new video soon!! 


What a beautiful jacket, your couture skills are wonderful. Thanks for sharing!
Gorgeous Jacket & Love the lining
Wow, that jacket is fabulous. I am interested in how you pad stitched – as this after the quilting? Did you quilt by hand?
Your jacket is lovely with just the perfect added details. I haven't taken any time to garment sew as I'm trying to finish a quilt first.
Thanks!!
Thanks sewmuch2learn!!
Hi Vicki! Thanks for the nice remarks!! I used pad stitching to add the roll to areas of the quilting that I didn't want flattened out. I machine quilted those areas with a doubled thread to give them dimension.
Thanks Virginia!!
Beautiful jacket. Love all the details.
Thanks Sew Jean!!